A leaking API 600 Gate Valve is more than an inconvenience; it’s a sign that critical maintenance is due. The most common cause is worn-out or failed gate valve packing. Performing a proper gate valve packing replacement is essential for maintaining system integrity, safety, and operational efficiency. This guide provides a detailed, professional procedure for this vital API-600 valve maintenance task.

Understanding Your API 600 Valve and Packing
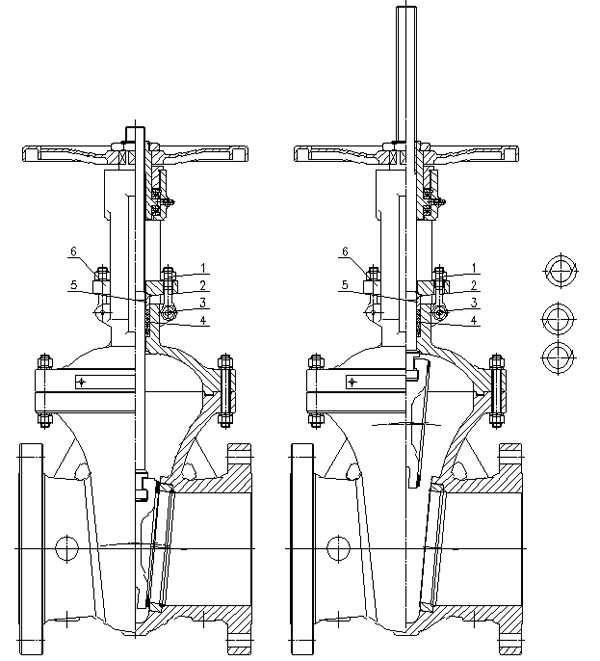
The API 600 valve standard signifies a robust, bolted bonnet steel gate valve designed for severe service applications. The packing system, located in the valve bonnet around the stem, is the primary seal preventing media from escaping to the atmosphere. Over time, this packing can wear, harden, or shrink, leading to the need for gate valve leaking repair.

Tools and Safety Precautions You’ll Need
Before starting any industrial gate valve packing procedure, gather the correct tools and prioritize safety.
• Tools: New API-approved packing rings (e.g., flexible graphite), packing puller, wrenches, safety glasses, gloves, and wire brush.
• Safety: Isolate the valve from system pressure! Ensure the valve is in the fully open position and the pipeline is depressurized and cooled. Always wear appropriate Personal Protective Equipment (PPE).
Step-by-Step: How to Replace Gate Valve Packing
Follow these steps to execute a safe and effective gate valve packing replacement on your API 600 Gate Valve.

Step 1: Isolate the Valve and Loosen the Gland
Confirm the valve is isolated and depressurized. Carefully loosen the nuts on the gland follower studs. Do not remove them completely at this stage. This relieves compression on the old packing set.
Step 2: Remove the Gland Follower and Old Packing
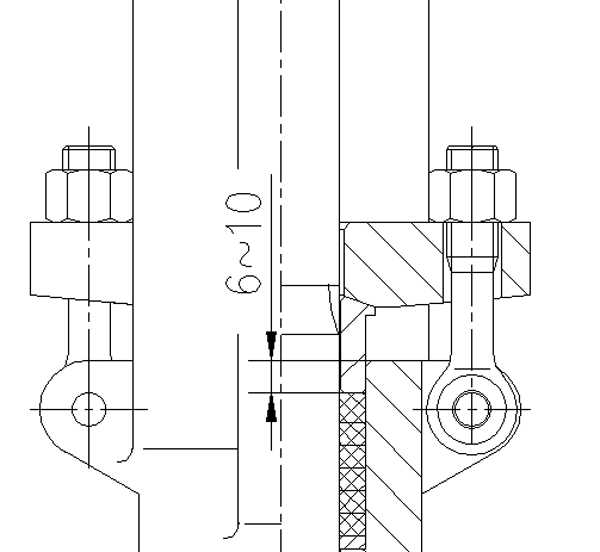
Once the nuts are loose, you can remove the gland follower. Using a specialized packing tool or a small pick, carefully extract all the old packing rings from the stuffing box. It is crucial to remove every fragment to ensure the new packing can seal correctly. Clean the stuffing box and valve stem with a wire brush to remove any debris.
Step 3: Install New Packing Rings Correctly
This is the most critical step. Take your new, approved gate valve packing rings.
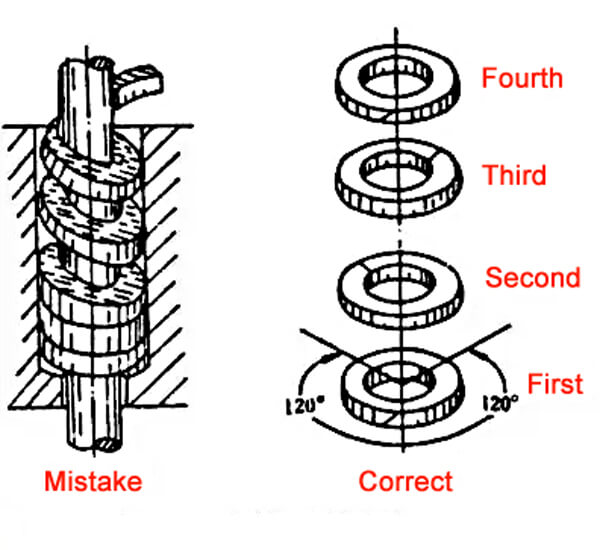
• Stagger the Joints: Install each packing ring individually. Ensure the seams (or rings) are staggered by 90 degrees from the previous ring. This prevents a direct path for leakage.
• Seat Firmly: Use the gland follower to gently tamp each ring into place, ensuring it is properly seated before adding the next.

Step 4: Re-assemble and Adjust the Gland
After all new packing rings are installed, replace the gland follower and hand-tighten the nuts. The key to a successful seal is proper gland adjustment.
• Finger Tight: Start by tightening the nuts finger-tight.
• Leak-Free Adjustment: With the valve back in service (and pressurized), slowly tighten the gland nuts a quarter-turn at a time until the leakage around the stem stops. Do not over-tighten, as this will create excessive friction, wear out the new packing prematurely, and make the valve hard to operate.
Why a Proper Industrial Gate Valve Packing Procedure Matters
Skipping steps or using incorrect techniques in your gate valve packing replacement can lead to premature failure, costly downtime, or even a safety hazard. A proper procedure ensures:
• Long-Term Reliability: Correctly installed packing provides a durable, long-lasting seal.
• Operational Safety: It prevents dangerous leaks of process media.
• Valve Protection: Prevents damage to the valve stem from over-tightening or debris.
Need Expert Help with Your API-600 Valve Maintenance?
If you are unsure about performing this gate valve leaking repair yourself, or if your valve is in a critical service application, always consult a specialist. NSW provides high-quality API 600 Gate Valves and expert technical support. Using genuine replacement parts is key to maintaining valve performance and warranty.
By following this professional industrial gate valve packing procedure, you can confidently maintain the seal of your API 600 valve, ensuring safe and reliable operation for years to come.
FAQs: Frequently Asked Questions About Gate Valve Packing
How often should gate valve packing be replaced?
There’s no single timeline for gate valve packing replacement. The frequency depends on operational factors like temperature, pressure, the cyclicity of the valve (how often it’s operated), and the chemical compatibility of the packing material with the process media. A key indicator is a visible leak from the stem, which signals that maintenance is required immediately. Regular inspection as part of your preventative API-600 valve maintenance schedule is the best practice.
What are the symptoms of failed valve packing?
The most obvious symptom is a consistent leak or weeping of the process fluid from around the valve stem. You might also see packing debris extruding from the stuffing box. In some cases, a valve that becomes very hard to operate can indicate that the packing has been over-tightened in a previous gate valve leaking repair attempt, causing excessive friction on the stem.
What is the best material for API 600 valve packing?
The “best” material depends on the service conditions. For high-temperature applications in API 600 gate valves, flexible graphite is often the preferred choice due to its excellent thermal stability and self-lubricating properties. For lower temperatures or specific chemical services, PTFE (Teflon) or aramid fibers (like Kevlar) may be suitable. Always consult the valve manufacturer’s specifications and consider the chemical and thermal properties of your system.
Can I replace valve packing while the system is pressurized?
No, you should never attempt a gate valve packing replacement on a pressurized system. This is extremely dangerous. The number one rule in any industrial gate valve packing procedure is to fully isolate the valve from pressure and ensure the pipeline is depressurized and cooled before starting any work. Safety must always be the top priority.
Why is my new gate valve packing still leaking?
If leakage persists after a gate valve packing replacement, several issues could be the cause:
• Under-tightening: The gland nuts may not be tight enough to compress the packing and form a seal.
• Stem Damage: A scored or pitted valve stem will not allow any packing to form a proper seal and may require stem repair or valve replacement.
What is the difference between gland packing and a mechanical seal?
Gland packing (what this article covers) is a traditional sealing method using several rings of deformable material compressed in a “stuffing box” around the stem. It’s robust and repairable in the field but allows for a minimal, controlled leak for lubrication. A mechanical seal is a more complex, precision assembly of faces that provide a near-zero leakage seal, typically used in rotating equipment like pumps. API 600 valves almost exclusively use gland packing due to their design and application.
Post time: Jun-30-2021


